Our top-tier consultancy services provide strategic guidance to elevate your entire digital presence.
Learn More
Contents
An introduction to Adobe After Effects
After Effects is a powerful creative tool software created by Adobe. It is one of the most powerful creative tools available for personal and commercial use. It is often used in website, film and TV show production.
This 2.5D animation software can be used to create visually stunning motion graphics, animation, VFX and so on. However, working with After Effects can sometimes be a bit frustrating, especially if you’re new to the software. The wide array of tools it provides makes it harder to pick up compared to other graphic design tools, with features and functions hidden where you might least expect them.
The good news is that there are several tips and tricks that you can use to make your After Effects workflow easier and more efficient. While these tips probably won’t turn you into an expert overnight, they are a good launching point if you are interested in growing your skills with the software. Here are five tips to get you started.
1. Creating Composition to make work easier.
Creating a composition can make editing/resizing certain composition or elements easy. To do this, Select the layer you wanted, then right-click and press ‘pre-compose’.
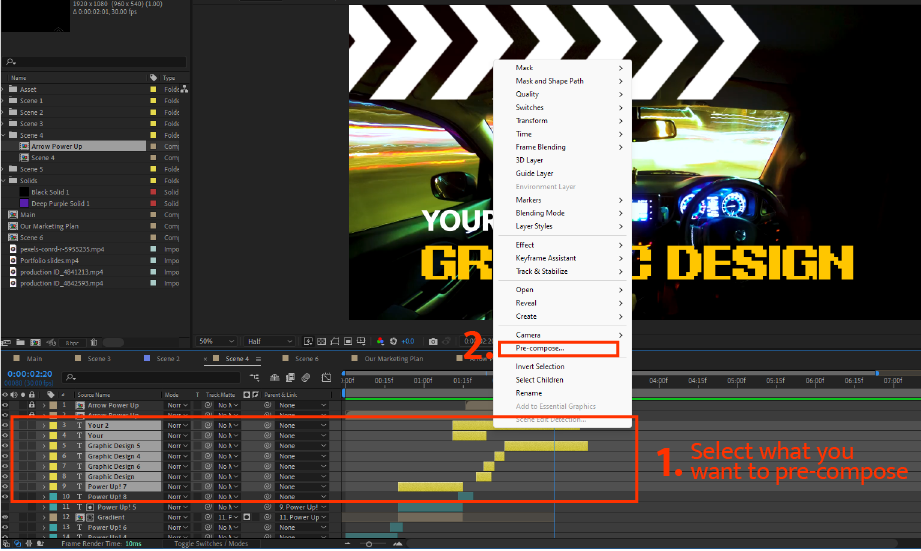
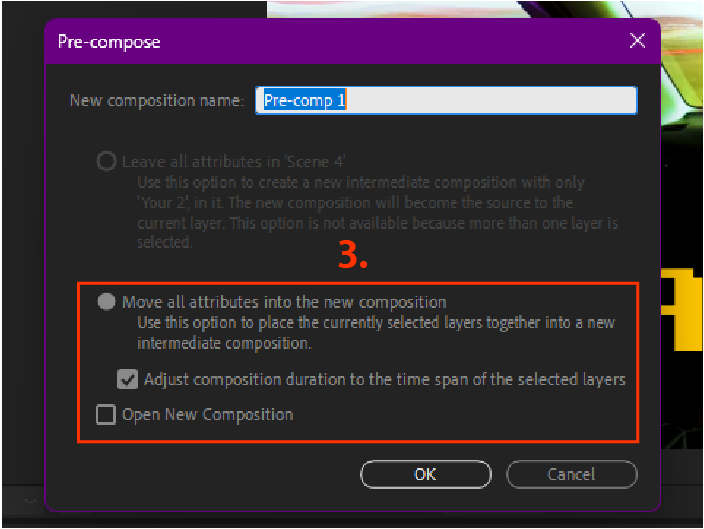
Inside the pop window, choose “Move all attributes into the new composition” and check “Adjust composition duration to the time span of the selected layers”. Then click “ok”. Once it is pre-composed, you can freely move the graphics around without worrying about disrupting the keyframes, but note that scaling the composition might lose its quality.
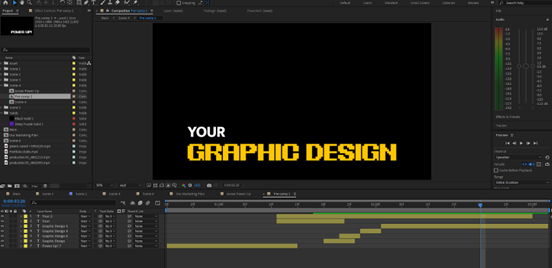
By double-clicking the pre-composed layer, you can edit your layer without affecting other layers.
2. Combining Keyframing and Parent
Once you’ve keyframed an object, you can use Parent from another object to replicate the movement from the first object. These can be done for text effects, motion graphics and video editing.

You can do this by clicking the “@” icon and dragging it from the “Parent and Link” row, and placing it in the keyframed object. After doing so, it will follow the keyframed object. The “linked” object can also be animated to create more complex animation.
This function is very useful for motion graphics and animation, as it allows for complex animation and simplifies the process.
3. Make After Effect Files easily sharable and accessible for everyone
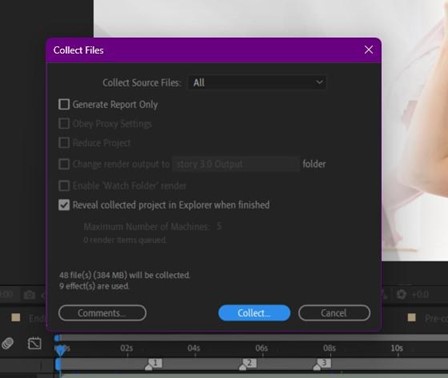
If you think sharing files with After Effect is troublesome, you’ll be surprised to learn that the ‘Collect files’ function can be a tremendous help. It makes it convenient to share it with people with less than half the hassle.
The function is located at “ File > Dependencies > Collect files. “
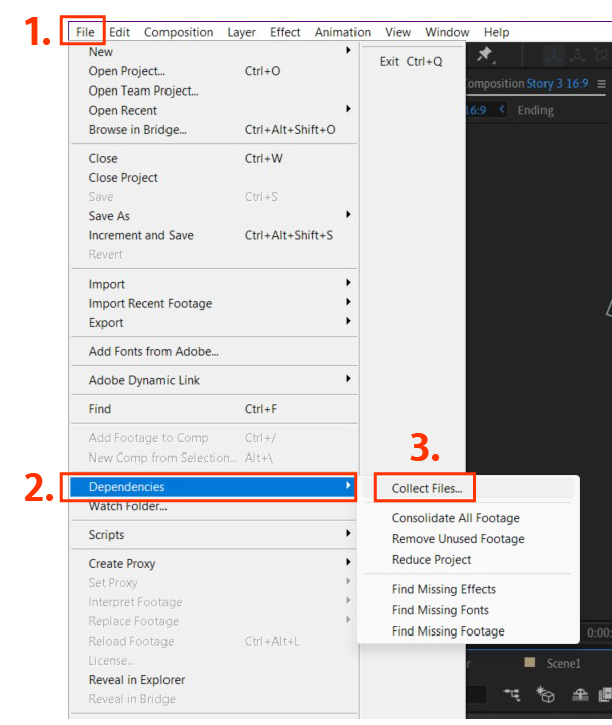
Inside the “Collect files” files window, remember to set the ‘Collect Source files’ to ‘All’. You can also check the final box to make it easier to locate the file. Once that is done, click “Collect…” and watch the magic happen.

4. After Effect crashing? Try enabling autosaving
Experiencing frequent crashes can be frustrating and time-wasting, especially losing hours and hours of work. Enabling the autosaving feature can minimise the risk of losing hours of hard work you’ve been working on. To enable the feature, go to “Edit > Preference > Autosave…”
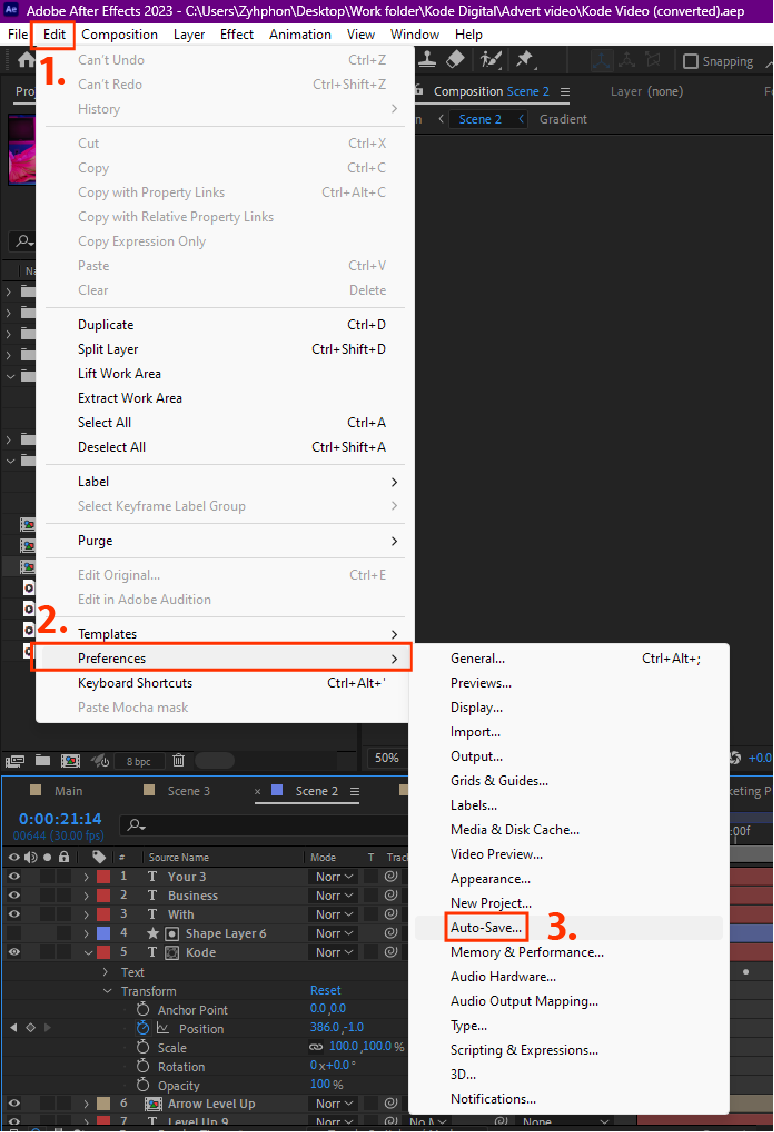
For me, autosaving every 25 minutes is a decent frequency as it is not much of a disruption and ensures you don’t lose more than 25 minutes of progress.
Enabling autosaving in After Effects is a simple and convenient way to protect your work, save time and reduce stress. It is a useful feature for anyone working on a demanding project in After Effect.
5. Reducing Large stock videos files to save space and increase AE performance
Though this is not much of an ‘After Effect’ tip, it will help you save tons of space and improve performance when working on your files.
Not all companies use 8k High Resolution 60 fps footage, and a majority of companies still use at least 1080p videos. In my experience, MOV files can also cause problems when editing. Try to convert it into .MP4 to reduce its size and make your After Effect runs better.
You can find a website that helps you compress the video file, or you can use Adobe Media Encoderto convert a huge batch of videos just by dragging it into the queue window.
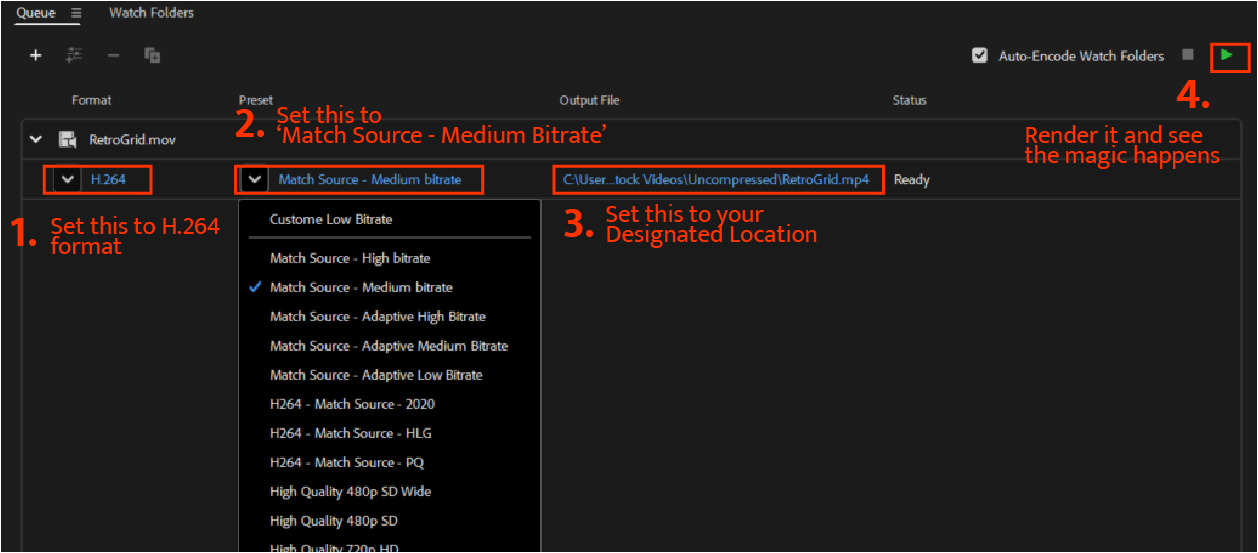
By dragging and dropping the video you wanted into the queue window, click on the arrow button and choose “H.264” in the format row, then click the arrow button at the preset row, and choose “Match Source – Medium bitrate”. These settings will reduce the video sizes without reducing video quality. Then you can press the green export button on the right and wait for it to render.
After Effects editing made easy
Optimising your workflow in After Effects can significantly enhance your efficiency and productivity. By implementing these tips, you can make your workflow easier.
Each 5 of these tips contributes to a smoother and more effective After Effects experience. Try to experiment with these tips, adapt them to your unique workflow, and continue exploring new techniques to improve your efficiency in After Effects.
With practice and a finely-tuned workflow, you’ll be able to create spectacular graphics and animations in After Effects. Whether you’re a seasoned user or just beginning your journey, these tips will unlock new possibilities and ignite your passion for the software. Get ready to bring your visions to life like never before!
Kode Digital is a creative digital agency with specialisations in many different aspects of digital marketing. This includes graphic design with tools like Adobe After Effects and Photoshop, of which we have discussed in previous blog articles. Learn more about what Kode Digital can do for you by visiting our website.


